
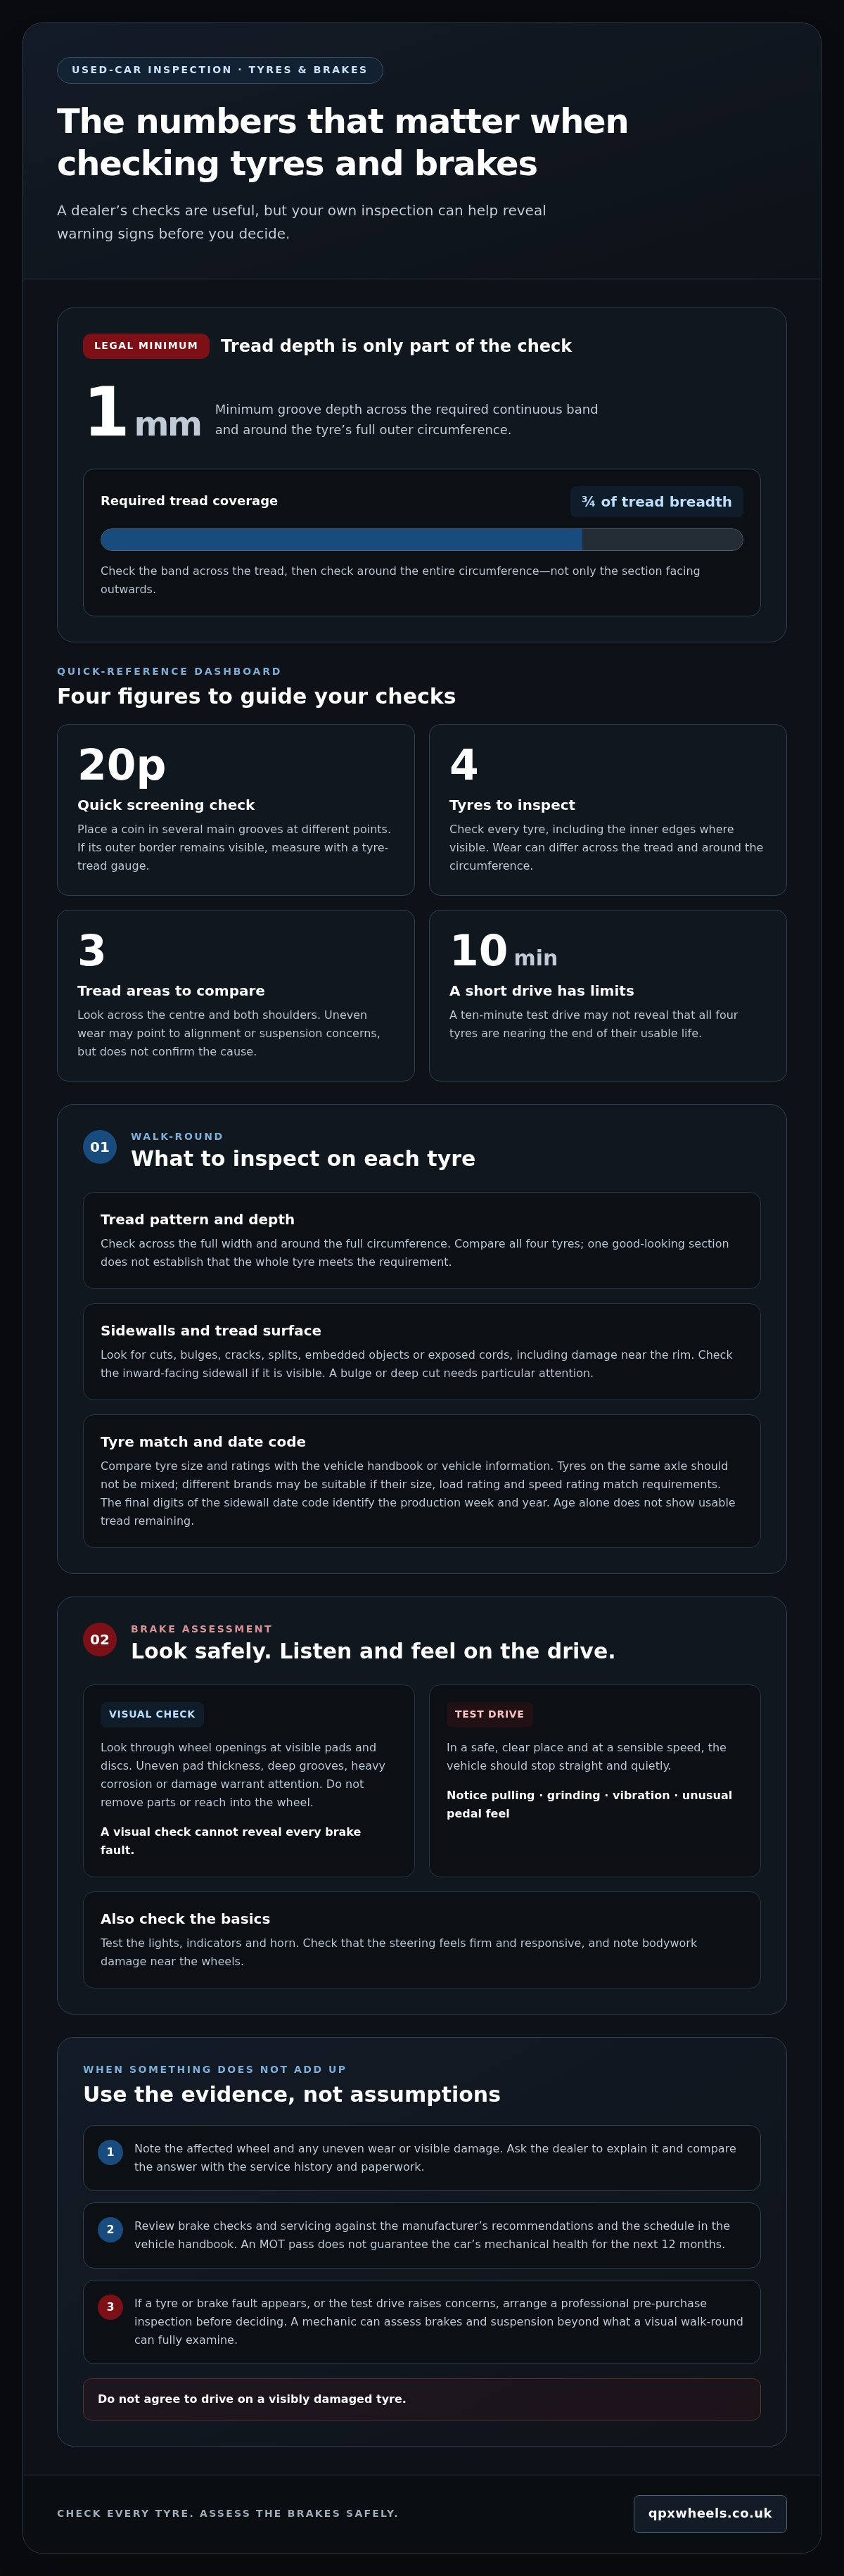
A dealer’s checks shouldn’t be your only safeguard when buying a used car. Knowing how to inspect used car tyres and brakes helps you spot warning signs before you decide. In the UK, tyre tread must be at least 1 mm across a continuous band covering at least three-quarters of the tread and around the tyre’s full circumference, according to the UK Government.
Expect clear information about a car’s condition, but make your own checks in person too. Uneven tyre wear, cuts or bulges need attention, and the way the car responds when you brake on a test drive can reveal issues that aren’t obvious at a glance.
This guide explains how to check tyre tread depth and condition, what to know about a dealer’s responsibilities, and how to assess the brakes safely during a test drive. You’ll also learn when a professional pre-purchase inspection can provide a clearer picture before you commit.
Key Takeaways
- Measure tread in several places and inspect the full tyre for damage; according to the UK Government, tread must be at least 1 mm across the required band and circumference.
- Look for uneven wear, which can point to alignment or suspension concerns, and treat visible tyre damage as a warning sign.
- A visual check can’t reveal the full condition of brake components, and an MOT pass doesn’t guarantee a car’s mechanical health for the next 12 months.
- On a test drive, notice whether the car stops straight and quietly, and watch for grinding, vibration or pulling when braking.
- If anything feels wrong, arrange a professional pre-purchase inspection before deciding whether to buy.
So how can I check the tread depth?
- Park the vehicle on level ground, turn the steering to expose the front tyres, and inspect all four tyres. According to UK Government, a tyre is illegal if its grooves do not have a depth of at least 1 mm throughout a continuous band measuring at least three-quarters of the breadth of the tread and round the entire outer circumference of the tyre. Check the full circumference, not just the section facing outwards.
- Use a 20p coin as a quick screening check. Place it in several main grooves across each tyre and repeat at different points around the circumference. If the coin’s outer border remains visible, measure the tread with a tyre-tread gauge rather than relying on appearance. Check across the centre and both shoulders, since wear can differ from one part of the tread to another.
- Inspect each tyre’s sidewalls and tread for cuts, bulges, cracks, embedded objects or exposed cords. Compare the size and ratings with the vehicle handbook or the information displayed on the vehicle. Tyres on the same axle should not be mixed. Different brands may be suitable if their size, load rating and speed rating match the vehicle’s requirements.
- Check the date code moulded into each tyre’s sidewall to see when it was made. The final digits identify the production week and year. Check every tyre, as they may have been fitted at different times. If a code is damaged or difficult to read, consider that alongside the tread, condition and service history. Age alone doesn’t show how much usable tread remains.
- Look through the wheel openings at the visible brake pads and discs, without removing parts or reaching into the wheel. Uneven pad thickness, deep grooves, heavy corrosion or damage warrant attention, but a visual check can’t reveal every brake fault. Review the service history for brake checks and servicing in line with the manufacturer’s recommendations. Compare recorded work with the servicing schedule in the vehicle handbook.
- Test the brakes in a safe, clear place and at a sensible speed during your test drive. The vehicle should stop straight and quietly. Note any pulling, grinding, vibration or unusual pedal feel. Test the lights, indicators and horn, and check that the steering feels firm and responsive. During your walk-round, look for bodywork damage near the wheels and note whether uneven tyre wear could be related to alignment.
Don’t dealers have a responsibility to check the tyres?
A dealer’s checks are useful, but they don’t replace your own inspection. Before deciding to buy, compare the tyres’ visible condition with what the seller tells you.
-
Look for uneven tyre wear
Stand back to compare the tyres, then inspect each tread across its width. Wear concentrated along one shoulder, a smoother centre or patches worn more heavily than the surrounding tread can point to a problem. Uneven wear may indicate wheel misalignment or suspension issues, but the pattern alone can’t confirm the cause. Note which tyre is affected and raise it before agreeing to buy.
-
Inspect the tyre sidewalls
Walk around the vehicle and examine the visible sidewall of every tyre. Look for cuts, cracks, bulges, splits or exposed cords, and check for damage near the rim. A bulge or deep cut needs particular attention, unlike light surface marking. Check the inward-facing sidewall if it’s visible, as a walk-round may not reveal the whole tyre.
-
Check tread coverage across each tyre
Inspect the tread from shoulder to shoulder, then look around the full circumference. According to the UK Government, a tyre is illegal if its grooves do not have a depth of at least 1 mm throughout a continuous band measuring at least three-quarters of the breadth of the tread and round the entire outer circumference. One good-looking section doesn’t establish that the whole tyre meets the requirement. Compare all four tyres, including inner edges that are harder to see.
- Ask the dealer to explain any uneven wear, sidewall damage or tyre replacement noted in the records. Be specific: identify the wheel and visible issue, then compare the explanation with the service history and paperwork. A clear answer helps you assess whether the condition has been addressed. Don’t treat a general statement that the vehicle has been checked as a substitute for inspecting each tyre yourself.
- Use what you find to guide your decision and any price discussion. If a tyre appears damaged or needs replacement, ask whether the issue will be addressed before purchase, or factor it into your buying assessment. Avoid agreeing to drive on a visibly damaged tyre. If the tyres look sound but wear is uneven, consider whether alignment or suspension concerns need further assessment before proceeding. These used-car buying choices are best made with the tyre condition clearly understood.
Knowing when to seek a professional inspection
Arrange a professional pre-purchase inspection before deciding to buy if you spot a tyre or brake fault, or if the test drive raises concerns. A used-car mechanic can assess the brakes and suspension, which a visual walk-round can’t fully examine.
- Book an inspection if anything seems unusual during your checks or test drive. This could include steering vibration, braking noise, the car pulling to one side or uneven tyre wear. These signs can point to tyre, alignment, wheel, suspension or brake issues. Don’t treat one symptom as a diagnosis. Tell the mechanic exactly when it happens.
- Remember the limits of a short drive. A ten-minute test drive may not reveal that all four tyres are nearing the end of their usable life, and a brief route offers limited opportunity to assess the vehicle in different conditions. If the tyres’ condition remains uncertain after your visual checks, ask for an inspection before buying.
- Request a pre-purchase inspection if you can’t see enough of the components to assess them properly. A professional can check the brakes and suspension, including parts that aren’t visible through the wheels. This is particularly useful if the seller’s description, service history and your observations don’t seem to match.
- Use the vehicle’s mileage and previous records as context, not proof of its condition. Look for gaps in the service history or unclear maintenance entries, then note specific questions for the inspection. A mechanic can assess the vehicle’s current condition alongside its records. Mileage alone doesn’t show how the car has been driven or whether faults have developed.
- Include the interior, bodywork and a full road test in your overall assessment, but don’t let tidy presentation outweigh a safety concern. A clean cabin or polished bodywork doesn’t prove that the brakes, tyres or suspension are sound. If a warning sign remains, make an inspection part of your decision before agreeing to buy.
- Prepare a concise list before the inspection. Note each symptom, the wheel or area involved, and whether it appeared during braking, turning or ordinary driving. Share relevant service-history entries and previous inspection findings. Specific examples help focus attention on the faults that matter, rather than relying on a general impression or a single short journey.
Limits of judging brake components visually
A visual check can flag concerns, but it can’t reveal the complete condition of brake components. Use these steps to distinguish what you can observe from what needs closer assessment.
- Look through the wheel openings at the visible parts of each brake disc and pad. Note obvious scoring, corrosion, damage or uneven-looking pad wear, but don’t assume a clean appearance proves the brakes work correctly. Some components are hidden behind the wheel or within the braking system. Don’t remove parts or reach into the wheel. Note what you can see and ask the seller about any visible concern.
- Listen and observe during a test drive, as braking behaviour adds information that a stationary visual check can’t provide. Pay attention to grinding, vibration, pulling or unusual noises, and note when they occur. A noise heard only while braking differs from one heard as the vehicle moves. Notice whether the steering feels stable too. Record warning signs rather than guessing their cause from sound alone.
- Use MOT information as one part of your assessment, not a forecast of future condition. A valid MOT doesn’t guarantee the vehicle will remain in good mechanical health for the next 12 months. In April-June 2025, 27.24% of Class 3 and 4 vehicles had an initial MOT failure, while 6.10% of Class 3 and 4 MOT tests recorded a brake-related defect. These figures give context, but don’t diagnose a particular car.
- Compare the MOT record with the vehicle’s current condition and service history. Check the latest certificate and any recorded advisories, then consider whether the seller’s description matches the visible components and test-drive behaviour. An older MOT result reflects the vehicle’s condition at the time of the test, not necessarily today. For example, a recent brake noise needs attention even if the certificate is valid.
- Arrange a professional pre-purchase inspection if your visual check or road test raises a concern. A mechanic can assess brake components and suspension beyond the areas visible through the wheels. Share specific observations, such as grinding during braking or vibration through the steering, rather than asking for a general opinion. If a warning sign affects braking, don’t rely on a smooth-running engine or tidy bodywork as evidence that the brakes are sound.
Testing the brakes during a test drive
A test drive is an important part of how to inspect used car tyres and brakes. Choose a suitable route, stay alert to traffic and note how the vehicle responds whenever you brake.
- Before moving off, check that the brake pedal feels consistent when pressed and that no warning light remains on the dashboard. Notice if the pedal feels unusually soft or firm, but don’t diagnose the cause by feel alone. If a warning appears or braking seems impaired before you set off, don’t continue the drive. Raise the concern with the seller.
- Begin with a gentle brake application in a clear, safe place. The vehicle should slow smoothly, without unexpected noises or a sudden change in direction. Pay attention to how the pedal responds as the car slows. One gentle stop gives an initial impression, but doesn’t replace checking the brakes throughout the rest of the test drive.
- Where the route allows, assess braking at different speeds and on different stretches, including uphill roads and around corners. Keep each manoeuvre controlled and appropriate to the road conditions. Listen for unusual noises and note whether vibrations come through the pedal, steering wheel or vehicle body. Record when each symptom occurs, as the circumstances can help explain what needs further assessment.
- Check whether the car stops straight and quietly when braking. If it pulls to one side, note the direction and whether it happens again on another suitable stretch. Pulling can indicate a brake or alignment concern, but the sensation alone can’t identify the responsible component. Don’t dismiss it as road camber or a minor quirk without considering the route and repeated observations.
- Listen carefully for grinding during braking, which can indicate a brake problem. To distinguish it from ordinary road noise, notice whether it starts or changes when you press the pedal. Watch for vibration, squealing or other unusual noises, and note whether they happen during braking or while driving freely. These observations help you describe the concern clearly after the drive.
- After the drive, write down each symptom, the road conditions and the action that triggered it. Share those details with the seller and include them in your decision about further inspection. Don’t assume a quiet stop proves every mechanical component is sound. Applying how to inspect used car tyres and brakes as a practical routine means recording what you observe, then seeking a professional inspection if braking behaviour causes concern. Use those findings as part of a careful used-car buying search.
QPX Wheels: Used Vans
QPX Wheels sells used vans for buyers continuing their search after checking a vehicle’s tyres and brakes. If an inspection raises concerns, use its findings to guide your next choice and compare the condition of any van you consider. QPX Wheels also sells used cars and offers a vehicle valuation service and Hire Purchase (HP) finance, whether you’re replacing a vehicle or considering how to fund a purchase.
Take your time reviewing the vehicle and its condition before deciding. Use the checks in this guide alongside any professional inspection you arrange to make a clearer buying decision. To explore used vans or discuss your next step, contact QPX Wheels.
Make your next vehicle decision with confidence
Knowing how to inspect used car tyres and brakes helps you turn observations into practical buying criteria. Decide which concerns need professional assessment, what information you still need and whether the vehicle suits your day-to-day journeys. A careful decision doesn’t require finding a fault-free car. It means understanding its condition and making an informed choice that feels right for you.
If you’re continuing your search, QPX Wheels offers used cars and vans. Its vehicle valuation service can also help if you’re considering replacing your current vehicle. Keep your priorities in view as you compare options, and take time to choose what suits your needs.
Contact QPX Wheels to discuss your next vehicle. With a clear set of checks and questions, you can move forward with greater confidence.
Frequently Asked Questions
How do I know if the tyres are in good condition?
Check that every tyre has even tread, no visible damage and the correct size and ratings for the vehicle. Inspect both inner and outer shoulders, as wear can differ across the tread. For example, a smooth inner edge alongside deeper centre grooves may signal uneven wear. Compare all four tyres and note differences in condition or specification, then use the vehicle handbook to check which tyres are suitable.
Is it bad if all four tyres on a used car are different brands?
Different brands across the car aren’t automatically a problem if each tyre meets the vehicle’s size, load rating and speed rating requirements. Check that tyres on the same axle aren’t mixed, and compare their condition and tread wear. For example, different brands front and rear may meet the vehicle’s specifications, while mismatched tyres on one axle need closer attention. Use the handbook or tyre information to confirm the correct specification.
Should I replace tyres after buying a used car?
Replace a tyre if it has visible damage or fails the required tread-depth check. Otherwise, assess its actual condition rather than replacing it simply because the car is used. Check the full tread and sidewall of every tyre, including the inner edges where visible. Don’t use a tyre with a cut, bulge or questionable wear as normal. Arrange a professional assessment before driving on a visibly damaged tyre.
What should you check before starting a used car?
Before setting off, adjust the seat and mirrors, fasten your seat belt and release the handbrake only when safe. After starting the engine, check the dashboard for warning lights, then test the horn, lights and indicators. Look for people or obstacles around the vehicle and confirm the route is clear. If a brake warning light stays on or the pedal feels abnormal, don’t begin the test drive.
How do I check used car tyre tread depth in the UK?
Use a tread-depth gauge for a direct measurement, checking several grooves across the tyre and at different points around its circumference. Measure the central tread area as well as both shoulders, because wear may be uneven. A 20p coin can provide a quick visual screening, but it doesn’t give an exact measurement. Check every tyre individually and record any reading close to the legal minimum for closer assessment.
What is the UK legal minimum tyre tread depth and how is it measured?
For a car, the legal minimum is 1 mm across a continuous band covering at least three-quarters of the tread’s breadth and around the tyre’s entire outer circumference, according to the UK Government. Measure in several grooves across the central band and repeat at different points around each tyre. A reading in one spot isn’t enough to establish compliance; check the full circumference and all four tyres.
How do I inspect tyres for cracks, bulges, uneven wear and damage?
With the vehicle parked safely, examine each tyre’s visible sidewall and tread in good light. Look for cracks, cuts, bulges, embedded objects and exposed cords. Check the inner-facing sidewall where visible, and compare tread wear from shoulder to shoulder and around the tyre. If one shoulder is wearing faster than the other, it may indicate an alignment or suspension concern. Note the wheel and seek an assessment.
What brake pad and disc thickness is safe, and when should they be replaced?
Safe pad and disc thickness depends on the vehicle’s specified minimum limits, so there’s no single measurement for every model. A visual check through the wheel can’t reliably measure all components or reveal hidden wear. Use the vehicle handbook and maintenance records to find the correct specifications, then have pad and disc thickness measured against those limits. Grinding, vibration or pulling during braking are reasons to seek an assessment before buying.


